InDesign Scripting Forum Roundup #14
April 21, 2026 | Snippets | en
Welcome back to a series that’s been quietly running since 2011 — yes, you read that right, fifteen years. Episode #13 dropped way back in June 2019, and honestly, we all thought that was the finale. But then something funny happened: the internet started forgetting things…
Foreword. — The internet was supposed to be the library that never burns. Nobody told Adobe. As their systems evolve and infrastructure gets shuffled around, discussions vanish. URLs break. Years of hard-won solutions and clever workarounds just... disappear into the digital void. At some point, even the scripting tag — the dedicated corner of the InDesign forum where all of this lived — quietly ceased to exist, as if the whole discipline had been administratively wished away.
And that’s a tragedy, because the InDesign scripting community has poured hours into solving real problems. Developers have debugged nightmares, discovered edge cases, and shared knowledge that shouldn’t evaporate the moment Adobe decides to reorganize their servers.
So here we are. Episode #14 exists for one simple reason: preservation. This roundup is a time capsule of the best technical discussions, the smartest solutions, and the most useful snippets that were floating around the forums. Think of it as an insurance policy against digital amnesia.
This will probably be the last episode in the series. So let’s make it count.
1/ Text Containers
How to Change a Text Frame’s Height by Line Count
How to Iterate over all Tables and Cells
How to Detect and Handle Overridden Text Frames
2/ Text and Characters
How to Identify U+FEFF and Other Hidden Characters
How to Capture Greek Letters in GREP
How to Replace Character Patterns the Right Way
How to Reorder Paragraphs without Touching your Data Source
3/ Managing Page Items
How to Recover Nested Frames
How to Add Random Circles to the Active Page
How to Rotate Some Page Items around an Arbitrary Point
About the Spread Coordinate Space in IDML
4/ Colors and Graphics
How to Use the Color Transform Utility
How to Replace Hex Text with Actual Hex Colors
How to Remove a Background Color in InDesign
5/ Miscellaneous
How to Deal with Libraries and Assets
How to Use the ‘afterNew’ Event
How to Replace an Existing Hyperlink
Understanding Measurement Units (Practical Summary)
About the ‘xmlns’ case in ExtendScript/XML
1/ Text Containers
How to Change a Text Frame’s Height by Line Count
Here is a common request in InDesign scripting: “I want to change the height of a text frame to a fixed value in mm, anchoring the text frame from top center. No changes in width of text frame.”
The problem? Fixing height in mm or pt doesn’t scale with your typography — font size, leading, and paragraph spacing all affect how many lines fit. A smarter solution? Specify the number of lines you want and let the script compute the height for you.
That’s what SelSetFrameHeightByLineCount does. The script lets you enter a line count (1–80), then automatically resizes your frame to match, anchored from the top center.
Select one or more text frames (or place your cursor inside one), run the script, and enter your desired line count. The script skips multicolumn or autosizing frames, then uses a duplicate to iteratively calculate the precise height needed to display exactly that many lines. It then applies the adjustment to your original frame — preserving width, anchoring from the top.
Fully undoable (Cmd+Z), and remembers your last value for next time.
Grab the improved, bug-fixed version from the IdGoodies repo:
→ SelSetFrameHeightByLineCount.jsx
→ YouTube Demo with threaded frames
• Original discussion: how-to-resize-a-text-frame-to-a-given-value-894538
How to Iterate over all Tables and Cells
finnr wrote: “I have a document containing a lot (maybe 100?) similar tables. These tables are used as graphical aids by coloring in certain cells -- rather than the normal use of displaying values. I do not want to manually change each cell color so I wrote a basic script that takes a selected table, looks at the values in one column, and tints the cells in each row accordingly. But now, I don’t want to select and run the code for each table manually so I thought I would add a bit extra to simply run the code for every table in the document. It somewhat works (it finds the values in the correct column and it does iterate through the table properly) but instead of only pulling a single cell’s value, it pulls multiple values.
For example, if I have two tables and the values to read through in the first table are [1, 3, 1, 2, 2, 1] and are [2, 3, 1, 1, 1, 2] in the second table, I would expect my code to go through the first table and then go through the second table. Instead, it reads ‘1,2’ and then ‘3,3’ etc.”
This is a “plural specifier” problem. The reference
app.documents[0].stories.everyItem().tables
is not an array of Table instances, it is an unresolved collection based on multiple stories. When you read tablelist for some value of t, what you actually get is a plural specifier that points out to every t-indexed table in every story. For example, tablelist[0] represents in a single expression the first table of all stories. Then tablelist[0].cells represents the set of every i-indexed cell in the first table of all stories. Hence the weird fact that tablelist[0].cells.contents returns an Array of strings.
All you have to do is to convert the plural specifier into an actual array of tables at the very beginning:
var tablelist = app.documents[0]
      .stories.everyItem()
      .tables.everyItem().getElements();

// . . .
Hence the suggested code for the particular project under consideration:
(function(  a,t,i,v)
{
    a = app.documents[0].stories.everyItem().tables.everyItem().getElements();
    while( t=a.pop() ) for( t=t.cells, i=t.length-1 ; i >= 3 ; i -=4 )
    {
        v = parseInt(t.contents,10);
        if( isNaN(v) || 1 > v || v > 3 )
        {
            // alert("Invalid fill value: " + v);
            t.fillColor = "Black";
            continue;
        }
        t[i-1].fillTint = (3==v)*100;
        t[i-2].fillTint = (2==v)*100
        t[i-3].fillTint = (1==v)*100;
    }

})();
• Original discussion: iterating-over-all-of-the-tables-in-a-document-835232
How to Detect and Handle Overridden Text Frames
In the InDesign scripting community, a common challenge arises when working with master pages and their text frames, especially when those frames are overridden on pages. A discussion highlighted this issue, where Ashrafali R. struggled with undoing overridden frames and encountered errors related to the undo stack. Here is the scenario:
— Creating a master (oops, parent) page with multiple text frames.
— Applying this master page to several pages.
— Running a script that overrides the master page’s text frames on each page, then immediately calls undo() to revert the override.
The problem encountered was an uncaught error related to the undo operation, which can happen if there is no undoable action available or if the undo stack is not in a suitable state.
Note: Using undo() within scripts is generally discouraged for several reasons. First, the undo stack may not always have an undoable action at the time undo() is called. Undo operations can interfere with the script’s flow and cause unpredictable errors. Finally, it complicates error handling and debugging. Instead, it is better to work with the document’s state directly and avoid relying on undoing actions programmatically.
The key to managing overridden text frames is to detect which frames on a Page are overridden relative to their MasterPage counterparts. We rely on properties such as page.masterPageItems (items inherited from the master), item.overridden (whether that item is overridden), item.overriddenMasterPageItem (reference to the master page item if overridden).
Below is a simplified example script that scans all pages in the active document and reports the count of text frames on the master page, local text frames, and those overridden from the master:
(function(  doc,pgs,pg,mfs,tfs,i,n,t,s)
//----------------------------------
// Demo: Simple Text Frame Report
// - assuming at most ONE parent page in the hierarchy
// - disregarding grouped/nested frames etc.
{
   doc = app.properties.activeDocument;
   if( !doc ) return;

   pgs = doc.pages.everyItem().getElements();
   for( ; pg=pgs.pop() ; )
   {
      // Get master items that are text frames (not overridden)
      mfs = pg.masterPageItems || [];
      for
      (
         i=mfs.length ; i-- ;
         'TextFrame' != mfs[i].constructor.name
         && mfs.splice(i,1)
      );

      // Get local text frames on page (incl. overridden)
      // and check which local frames are overridden.
      tfs = [];
      n = (t=pg.textFrames).length;
      while( n )
      {
         t = t.everyItem();
         s = t.overridden.join('')
            .replace(/true/g,'1')
            .replace(/false/g,'0');

         if( -1 == s.indexOf('1') ) break;

         for
         (
            tfs=t.getElements(), i=n ;
            i-- ;
            '1' != s.charAt(i) && tfs.splice(i,1)
         );

         break;
      }

      // Prepare summary
      s = "Page " + pg.name + "\r" +
         "Overall visible frames: " + (n+mfs.length) + "\r" +
         "----------------------\r\r" +
         "On Master: " + mfs.length + "\r\r" +
         "On Page:   " + n + "\r" +
         " - from master: " + tfs.length + "\r" +
         " - others:      " + (n-tfs.length);
      alert( s );

      // At this point,
      // `mfs` contains master (not overridden) frames,
      // `tfs` contains local frames that were overridden.
   }

})();
Side Note (from another discussion)
If your scripts use myItem.override(targetPage), take note that this command tends to shift the item when new pages have been added (or for other obscure reasons.) A generic bug fix is based on the targetPage.masterPageTransform matrix, whose nonzero translation components typically reflect the undesired shift:
// Fixed override()
var mx = targetPage.masterPageTransform.matrixValues.slice(-2);
mx[0] += 'pt';
mx[1] += 'pt';

try{ myItem.override(targetPage).move(void 0, mx) }
catch(_){ }
• Original discussions: undo-uncaught-exception-29-error-897839 | override-master-page-items-on-the-1st-page-only-888568
2/ Text and Characters
How to Identify U+FEFF and Other Hidden Characters
First and foremost, remember that you can always reveal a mystery character by selecting it and opening the Info panel. This will display its Unicode code point:
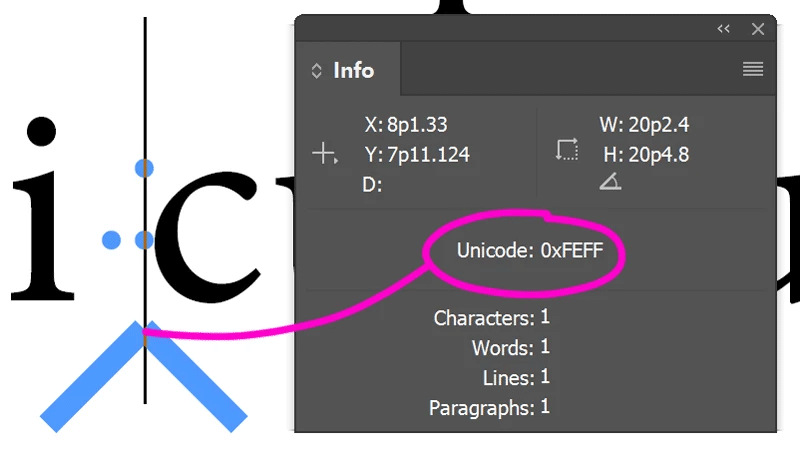
As noted by Uwe Laubender in the discussion, U+FEFF is a multi-purpose character that can represent several types of document anchors: index markers, cross-references, inner notes, conditional text, endnote story boundaries (start/end markers). Unlike variable markers (U+0018) and similar placeholders (U+0004, U+0016, U+0019), U+FEFF is semantically attached to marking a position in your text — one that’s associated with underlying document structure. It’s visually empty and follows the Unicode definition of ZERO WIDTH NO-BREAK SPACE, making it transparent and ignorable by default. This is why it’s distinct from U+FFFC (Object Replacement Character, used for inline/anchored objects) and U+FFFD (Replacement Character, used for unrepresentable glyphs).
Here’s a summary table of the most common special character codes used in InDesign markers (based on personal research):
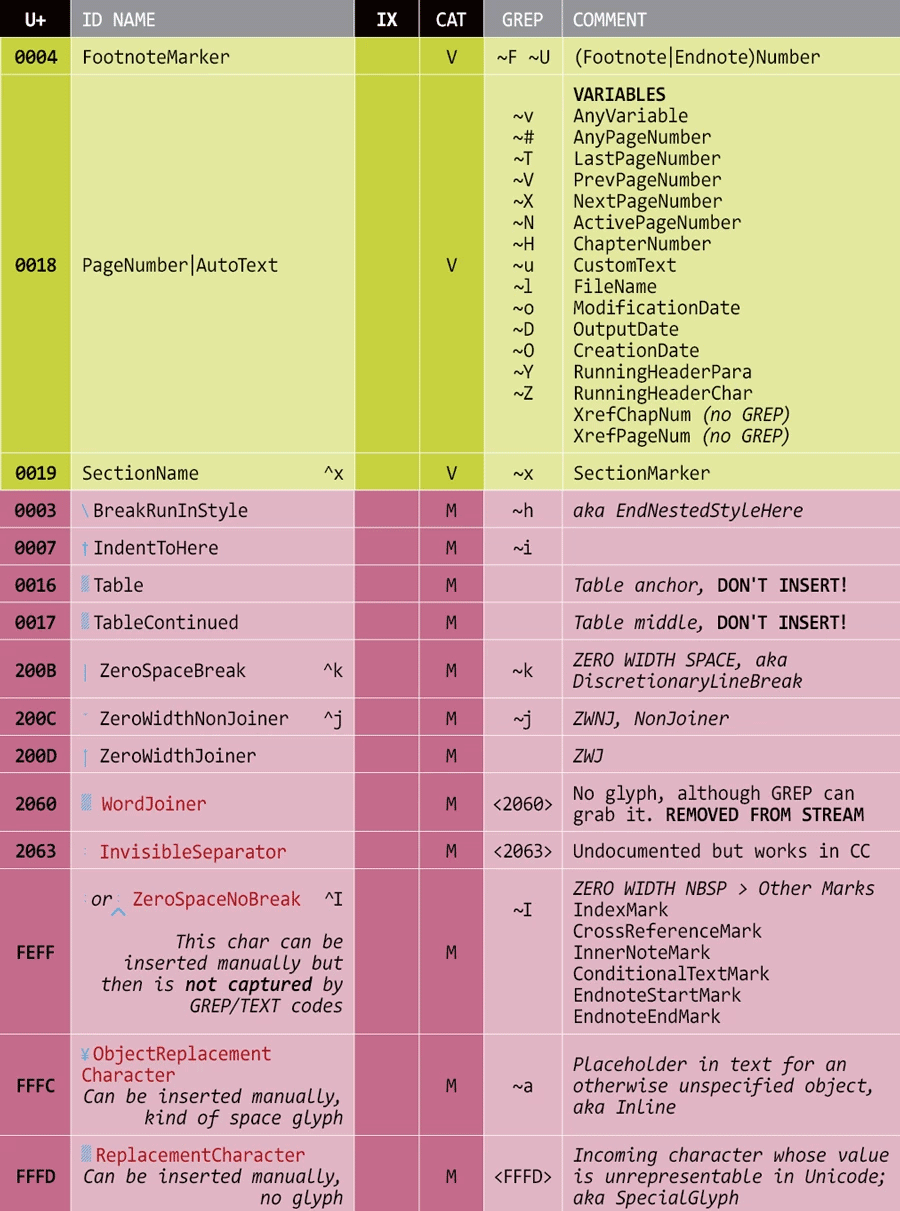
For a more comprehensive view, see our InDesign special characters reference.
• Original discussion: strange-symbols-when-creating-text-variable-876772
How to Capture Greek Letters in GREP
Participant: “I’m typing the Greek alphabet with minion pro, and when I try to make something small caps... it doesn’t work. I’ve searched adobe fonts and can’t find anything obvious to help. Of course I can change fonts, but it seems like it would be a weird oversight if there were really no Greek small caps with Minion.”
The discussion around this technical issue led to the more general question of capturing characters from the Greek alphabet. Here are some additional ideas regarding InDesign GREP patterns:
• The GREP metacharacter \l alone already captures any lowercase letter (including in Greek), so using a pattern like
(α|β|γ|δ|ε|ζ|η|θ|ι|κ|λ|μ|ν|ξ|ο|π|ρ|ς|σ|τ|υ|φ|χ|ψ|ω|\l)
is redundant.
• If you want to specifically capture lowercase Greek letters, then [α-ω] is shorter and usually sufficient.
• The basic Greek and Coptic Unicode block has additional lowercase characters with diacritics, hence you can extend the pattern to [\x{3AC}-\x{3CE}] for a better coverage.
• The Greek Extended block might be required too (see Greek script in Unicode). In that case a lookahead is useful to preselect lowercase letters before you specify the class:
(?=\l)[\x{370}-\x{3FF}\x{1F00}-\x{1FFF}]
Here is how this works in InDesign with the corresponding GREP styles (rendered in blue) applied to a sample text in Minion Pro:
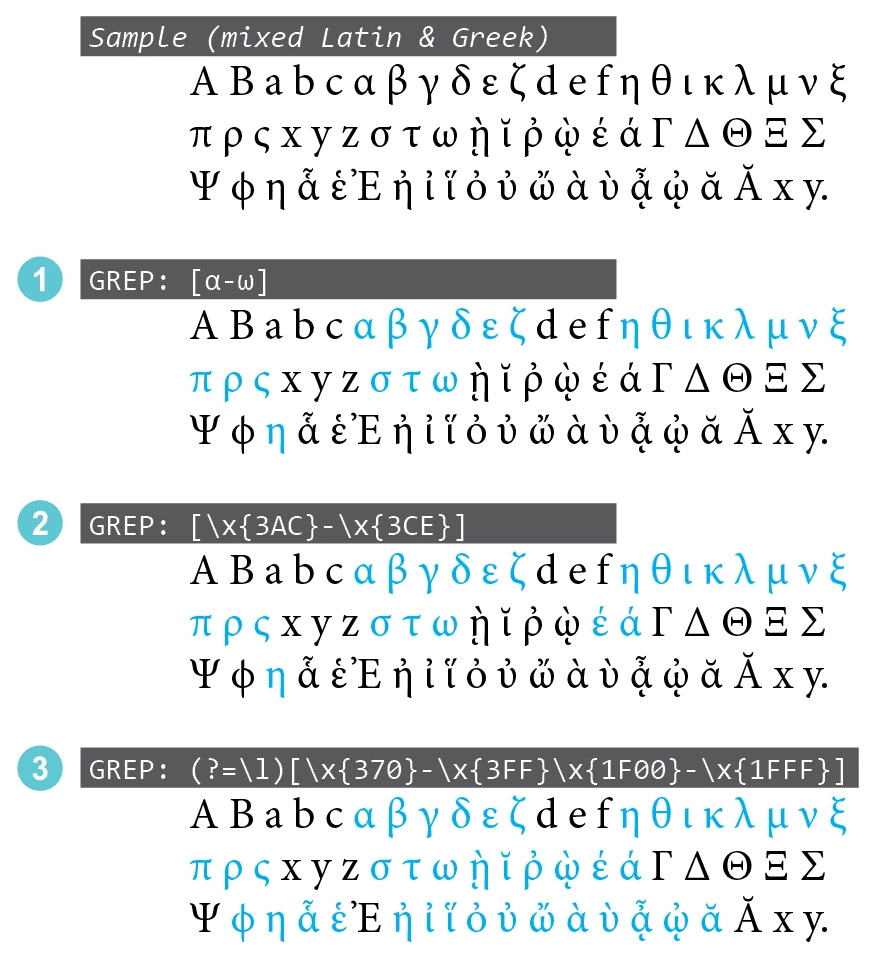
• Original discussion: minion-greek-small-caps-884835
How to Replace Character Patterns the Right Way
SpicyDoge wrote: “In a nutshell, I know exactly where my tab is by using indexOf to get the position of the tab I want. The problem is I simply cannot find a way to replace the text at that point. I’d like to replace "/t" (tab) with "~<\t" (thin space + tab). I’ve tried slicing and joining but it removes all my anchored images. I’ve tried selecting the tab location then using app.selection[0].changeGrep() to replace the text but it only works on the first occurance. I’m stumped, what am I missing here?”
The insertionPoints collection is the way to go, as summarized by the short answer:
resultsByGREPFind.insertionPoints[0].contents = SpecialCharacters.THIN_SPACE;
Three basic ideas could be added:
• Work on Stories rather than TextFrames (unless you really know what you’re doing.) Stories allow to access and manage overset text.
• Do not select things that don’t require to be selected. Just send the right command to the destination object.
• Avoid both GREP and SpecialCharacters API when the task can be done via simple JS string operations. In this example, the THIN SPACE is just "\u2009".
Suggested code:
// YOUR SETTINGS
const SEARCH = '\t';       // TAB
const PREFIX = '\u2009';   // THIN SPACE

var from = app.activeDocument.stories.everyItem(),
    a = from.paragraphs.everyItem().texts.everyItem().getElements(),
    t,s,p;

while( t=a.pop() )
{
    // Get the location of the 2nd match in that paragraph.
    // ---
    p = (s=t.contents).indexOf(SEARCH);
    if( -1 == p ) continue;
    p = s.indexOf(SEARCH, 1+p);
    if( -1 == p ) continue;

    // No need to redo what is already done!
    // ---
    if( s.charAt(p-1) == PREFIX ) continue;
    // Prepend the prefix.
    // ---
    t.insertionPoints.contents = PREFIX;
}
Note: What is important is not while, but pop(). Thanks to myArray.pop() we go through the paragraphs in reverse order.
• Original discussion: how-to-insert-text-at-specific-position-834159
How to Reorder Paragraphs without Touching your Data Source
When third-party systems import product catalog data into InDesign, they often deliver it in a fixed order — structured by paragraph styles but locked into a sequence that doesn’t match your design needs. So what do you do when you need a different paragraph order without breaking the workflow?
The original question: “We have a 3rd party system that imports data into InDesign story boxes to create product catalogs using XML. The final text in InDesign is just text with paragraph and character styles — no XML tags or structure remain. We need to reorder the data, but any changes to the import process require significant development work, testing, and deployment time.”
In the example, the current import order is:
// Original order

   Name
   Item Number
   Details
   Size
   Price
   Name Chinese
   Details Chinese
   Size Chinese
But fields are needed in this order:
// Expected order

   Item Number
   Name
   Name Chinese
   Details
   Details Chinese
   Size
   Size Chinese
   Price
Rather than waiting for a system update or manually rearranging content, you can use a script to automatically reorder paragraphs based on their applied styles. The key is leveraging our TextSortParagraphs snippet with a custom ordering function.
The script works by defining your desired paragraph order, converting styles to sortable keys (transforms each paragraph’s applied style into a comparable value) and running the sort. I’ve implemented the example (that is, the custom paragraph style ordering) in the tests directory of IdGoodies:
→ CustomTextSortParagraphs.jsx
(The paragraph style names and ordering are hard-coded in the myCustomOrder function.)
Observe how out-of-scope paragraphs keep in place around the blocks. No changes needed to your data source or import system!
• Original discussion: reorder-paragraph-s-in-story-by-paragraph-style-script-876567
3/ Managing Page Items
How to Recover Nested Frames
Mauro Acciarri wrote: “Hi all! ???? I’ve been cracking my head over this and couldn’t find any solution neither related topic here. I’ve in my hands a file from a client that (I don’t undestand why) have text frames ‘pasted into’ regular frames… I need to find all instances and set them free.”
I don’t know of any clean method to remove a nested PageItem from its container. The code below is just a stopgap solution based on Select/Cut/PasteInPlace.
(function(  doc,a,t,z)
{
   doc = app.properties.activeDocument;
   if( !doc ) return;

   const REPL = +SelectionOptions.REPLACE_WITH;
   app.scriptPreferences.enableRedraw = false;
   // ---
   for( z=0, a=doc.allPageItems ; t=a.pop() ; )
   {
      if( 'TextFrame' != t.constructor.name ) continue;
      if( !t.parent.hasOwnProperty('paths') ) continue;

      t.select(REPL); // May fail due to locked items, etc
      app.selection.length && ( app.cut(), app.pasteInPlace(), ++z );
   }
   // ---
   app.scriptPreferences.enableRedraw = true;
   alert( z + ' text frames have been removed from hierarchy.')
})();
We obviously need a better approach… Maybe others will find it.
• Original discussion: how-to-find-nested-text-frames-text-frames-inside-regular-frames-889433
How to Add Random Circles to the Active Page
Coco had a funny idea: “I’m trying to write a script where I can generate a certain number of white circles at random locations of the page. Basically with the variable number of circles, I want to be able to achieve the different levels/stages of the text being eaten away(more circles means less text), and eventually to a point that makes the text not readable.”
Suggested code:
function addCircles(/*(num|str)=auto*/diameter,/*uint=auto*/count,  pg,DX,DY,dm,pp,shft,dx,dy,k,t)
//----------------------------------
// Add masking circles on the active page, that is, [Paper]-filled ovals.
// - diameter [opt] : diameter of each circle, either as a number in default
//   measurement unit, or as a val-unit string e.g. "1.5mm" or "28pt". If not
//   supplied, some diameter is automatically determined.
// - count [opt] : number of circles. If not supplied, a huge count is taken.
// => undef
{
   pg = 'LayoutWindow'==(t=app.properties.activeWindow||0).constructor.name
        && (t.properties.activePage);
   if( !(pg||0).isValid ){ alert("Please, make a page active."); return; };

   // [REM] Assumes DX,DY have the same MU.
   t = pg.bounds;
   DX = t[3]-t[1];
   DY = t[2]-t[0];

   // Diameter
   if( 'string'==typeof diameter && isFinite(t=parseFloat(diameter||'0')) && 0 < t )
   {
      dm = '?' != UnitValue(diameter).type && diameter;
   }
   else
   {
      t = +(diameter||0);
      dm = 0 <= t && t < (DX>>>1) && t < (DY>>>1) && t;
   }
   dm || (dm=Math.min(DX,DY)/10); // Fallback?

   // Oval props
   pp =
   {
      transparencySettings:null,
      strokeTransparencySettings:null,
      fillTransparencySettings:null,
      contentTransparencySettings:null,
      textWrapPreferences:{textWrapMode:+TextWrapModes.NONE},
      contentType:+ContentType.UNASSIGNED,
      geometricBounds:[0, 0, dm, dm],
      fillColor:'Paper',
      fillTint:-1,
      strokeWeight:0,
   };

   // Optimal count?
   (count>>>=0) || (t=parseFloat(dm), count=Math.round(DX*DY/(t*t)));

   // Create a set of sparse [dx,dy] shifts.
   // (Reduces the number of close circles.)
   const MR = Math.random;
   const SQ = 1.2*Math.sqrt(count); // must be > √count and < 0xFFFE
   const CHR = String.fromCharCode;
   for( shft={} ; shft.__count__ < count ; shft[k]=[ DX*dx, DY*dy ] )
   {
      do{ dx=MR(), dy=MR(), k=CHR( 1+(SQ*dx)>>>0, 1+(SQ*dy)>>>0) }
      while( shft.hasOwnProperty(k) );
   }

   // Generate the circles.
   with( Window.splash=new Window('palette','',void 0,{borderless:true}) )
   {
      margins=50;
      add('statictext',void 0,"Generating "+count+" circles...");
      show();
      update();
   }
   app.scriptPreferences.enableRedraw = false;
   for each( t in shft ) pg.ovals.add(pp).move(t);
   app.scriptPreferences.enableRedraw = true;
   Window.splash.hide();
};
app.doScript
(
   "addCircles( '25px', 200 )",
   void 0, void 0, +UndoModes.ENTIRE_SCRIPT,
   "Add Circles"
);
• Original discussion: script-to-place-circles-at-random-locations-of-the-page-to-cover-text-888441
How to Rotate Some Page Items around an Arbitrary Point
If your goal is to perform a rotation on any set of page items (e.g. the selection) as InDesign would do in the GUI, you only have to follow two rules:
1) Work in the pasteboard space for determining individual bounds (that’s what ID does),
2) compute the center point as the midpoint of minmax bounds (not the barycenter).
Here is a detailed implementation — in ExtendScript — that should work anywhere and whatever the original transform state of the items:
var myItems = app.selection; // Any array of page items
var myAngleDeg = 20;         // Your rotation angle (in degree)

// Absolute transform space (used by InDesign
// when you transform the selection).
const SPACE = +CoordinateSpaces.pasteboardCoordinates;

var xy = (function(/*PageItem[]*/a,/*CS*/sp,  bx,TL,BR,t,l,b,r,i,xy,v)
//----------------------------------
// Center point of `myItems` in SPACE coordinates (considering in-SPACE boxes.)
// This is how InDesign works when you manually perform a transformation on
// the selection: the default transform origin is not the 'barycenter' of the
// different box centers, it is the center of the overall bounding box, hence
// the min-max algo.
// => [num,num]
{
    bx = +BoundingBoxLimits.outerStrokeBounds;
    TL = [[0,0],bx,sp];
    BR = [[1,1],bx,sp];
    for( t=l=1/0, b=r=-1/0, i=a.length ; i-- ; )
    {
        xy = a[i].resolve(TL,sp)[0];
        (v=xy[0]) < l && (l=v);
        (v=xy[1]) < t && (t=v);

        xy = a[i].resolve(BR,sp)[0];
        (v=xy[0]) > r && (r=v);
        (v=xy[1]) > b && (b=v);
    }
    return [(l+r)/2, (t+b)/2];
})( myItems, SPACE );

var rot = (function(/*angleRad*/a,  c,s)
//----------------------------------
// Get the rotation matrix.
// => [num,num,num,num,0,0]
{
    c = Math.cos(a);
    s = Math.sin(a);
    return [c,-s,s,c,0,0];
})( myAngleDeg*Math.PI/180 );

// Perform the desired rotation around x,y (SPACE coords).
// ---
var orig = [xy,SPACE];
for( var i=myItems.length ; i-- ; myItems[i].transform(SPACE,orig,rot) );
Note that myItems can be set to any array of PageItem objects, not necessarily the active selection, and not even necessarily sharing the same spread!
Note: Not using explicitly transform and matrices does not mean that coordinate spaces are not involved behind the scenes. In fact, they always are, since InDesign works that way. The critical part of your code is the transformReferencePoint assignment, which explicitly refers to the origin of the pasteboard coordinate space. And this determines the center point of the rotation. Maybe a picture will make it clear:
Code:
var doc = app.properties.activeDocument;
doc.layoutWindows[0].transformReferencePoint = [0,0];

var sel = app.selection[0];
for( i=-1 ; ++i < 40 ; sel.rotationAngle += 2, $.sleep(200) );
• Original discussion: strange-behaviour-when-trying-to-rotate-around-0-0-point-885296
About the Spread Coordinate Space in IDML
Zective wrote: “After extracting the IDML file, I checked the TextFrame elements in the Spreads.xml file. However, when I calculate the position using a matrix, I get negative values. The document size and the TextFrame size are calculated correctly, but I’m not sure how to properly calculate the position.”
Coordinate spaces in IDML are detailed in the specification. The origin of the spread space is simply its center point:
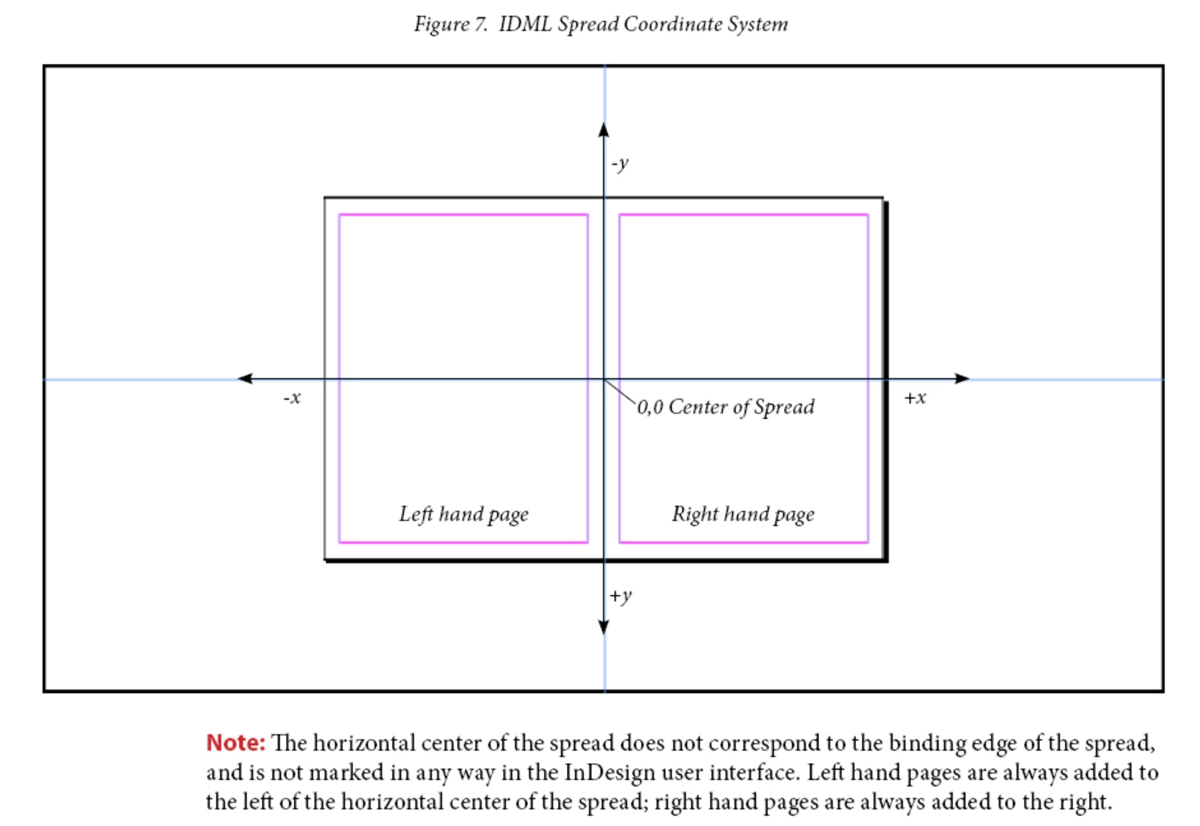
Then you use ItemTransform and PathGeometry elements to get space-relative coordinates, in pt.
• More on this topic: Coordinate Spaces and Transformations in InDesign
• Original discussion: how-to-determining-textframe-position-in-idml-using-xml-and-python-handling-negative-values-891618
4/ Colors and Graphics
How to Use the Color Transform Utility
Árpad wrote: “I have the following problem in InDesign 2025. I am trying to transform the CMYK color [41,46,56,36] to RGB color using the colorTransform method and the return value is [0,0,0] RGB color. Why? What am I not setting or doing wrong?”
By one of those obscure whims that belong only to the Adobe dev team, the method app.colorTransform(…) expects and returns numbers in 0..1 — except for the LAB color space which still uses the original colorValue ranges (L: 0..100, a: -100..100, b: -100..100). So you need to properly downscale (then upscale) the values found in your Swatch/Color objects, as dictated by the specific color spaces under consideration.
Best is to have in your toolbox an adapter routine, like this:
function colorTransform(/*num[]*/vals,/*str|ColorSpace*/from,/*str|ColorSpace*/to,/*int=0*/dec,  a,k,i)
//----------------------------------
// vals :: array of numbers *as processed by Color.colorValue*, that is
//       - [0..255, 0..255, 0..255]         in RGB space
//       - [0..100, 0..100, 0..100, 0..100] in CMYK space
//       - [0..100, -128..127, -128..127]   in LAB space
//       - [0..360, 0..100, 0..100]         in HSB space
// (Rem: MixedInk is not supported by app.colorTransform.)
// from  :: source ColorSpace or key string ('RGB'|'CMYK'|'HSB'|'LAB')
// to    :: dest. ColorSpace or key string ('RGB'|'CMYK'|'HSB'|'LAB')
// dec   :: rounding decimal digits (use -1 to bypass rounding);
//          default is 0, i.e. rounding to the nearest integer.
// Returns the converted values as a new array of 3 or 4 numbers in
// the expected ranges (i.e. as processed by Color.colorValue).
// => num[]
{
   from = from.toString().toUpperCase();
   to = to.toString().toUpperCase();

   if( from==to ) return vals.slice();

   switch( from )
   {
      case 'RGB':
         // app.colorTransform() expects r,g,b values in 0..1 (!)
         // -> divide by 255
         a = [ vals[0]/255, vals[1]/255, vals[2]/255 ];
         break;

      case 'CMYK':
         // app.colorTransform() expects c,m,y,k values in 0..1 (!)
         // -> divide by 100
         a = [ .01*vals[0], .01*vals[1], .01*vals[2], .01*vals[3] ];
         break;

      case 'HSB':
         // app.colorTransform() expects h,s,b values in 0..1 (!)
         // -> divide h by 360 and s,b by 100
         a = [ vals[0]/360, .01*vals[1], .01*vals[2] ];
         break;

      case 'LAB':
         // app.colorTransform() expects L,a,b values as given in original range,
         // that is, L:0..100, a:-100..100, b:-100..100
         a = vals.slice();
         break;

      default:
         throw "Unsupported color space " + from;
   }

   try
   {
      a = app.colorTransform(a, ColorSpace[from], ColorSpace[to]);
   }
   catch(e)
   {
      throw "Unable to convert " + a + " from " + from + " to " + to + " [" + e + "]";
   }

   switch( to )
   {
      case 'RGB':
         // app.colorTransform() returns r,g,b values in 0..1 (!)
         // -> multiply by 255
         a[0]*=255; a[1]*=255; a[2]*=255;
         break;

      case 'CMYK':
         // app.colorTransform() returns c,m,y,k values in 0..1 (!)
         // -> multiply by 100
         a[0]*=100; a[1]*=100; a[2]*=100; a[3]*=100;
         break;

      case 'HSB':
         // app.colorTransform() returns h,s,b values in 0..1 (!)
         // -> multiply h by 360 and s,b by 100
         a[0]*=360; a[1]*=100; a[2]*=100;
         break;

      case 'LAB':
         // app.colorTransform() returns L,a,b values in original range,
         // that is, L:0..100, a:-100..100, b:-100..100

      default:;
   }


   if( 0 <= (dec|=0) )
   {
      k = Math.pow(10,dec);
      for(i=a.length ; i-- ; a[i]=Math.round(k*a[i])/k );
   }

   return a;
}

// TEST: Transform the CMYK color [41,46,56,36] to RGB
// ---
var res = colorTransform( [41,46,56,36], 'CMYK', 'RGB' );
alert( res ); // => 113,97,82
• Original discussion: indesign-script-colortransform-methode-incorrect-return-value-894802
How to Replace Hex Text with Actual Hex Colors
Our colleague Colin Flashman encountered the intellectual limitations of AI agents: “I have an issue where I have strings of hex codes that I have to change into a square that will be in the actual hex code itself. For the moment I’m changing them to the letter X (but will change the X later to a square using a font such as wingdings). I’ve been experimenting with ChatGPT to write code recently, and it’s very much a hit and miss affair. It has generated a script that is close, but when I run my script, here is what I get...”
The vibe-coded script is easy to edit so it directly applies the colors to the hex codes (the operation is even simpler).
Suggested code:
function findReplaceHexColors(/*?str*/ADD_ON,  doc,K,pp,a,q,sto,s,m,i,t,x,k,p,z,rgb,color)
//----------------------------------
// Detect #RRGGBB or #RGB patterns and add a suffix (ADD_ON arg) with that
// fill color applied.
// [CHG240113] Leave ADD_ON arg empty (or falsy) to get the colors
// applied to the hex codes themselves.
// [REM] This function does not explore tables, notes, etc.
{
   // Declare once and for all the regex (`#RGB` or `#RRGGBB` form).
   const HEX_REG = /#(?:[0-9a-f]{3}){1,2}\b/gi;

   // [CHG240113] Normalize ADD_ON (1st arg).
   'string' == typeof ADD_ON || (ADD_ON=false);

   // Check ref to active doc.
   if( !(doc=app.properties.activeDocument) ) return;

   // Store `doc.colors` collection and presets rgb prop.
   K = doc.colors;
   pp =
   {
      model:      +ColorModel.process,
      space:      +ColorSpace.rgb,
      colorValue: void 0, // pending
      name:       void 0, // pending
   };

   // Array of Story instances.
   a = doc.stories.everyItem().getElements();

   // Loop through all text units.
   for( q={} ; sto=a.pop() ; )
   {
      s = sto.texts[0].contents;      // s :: str          ; tx contents
      m = s.match(HEX_REG);           // m :: str[]|null   ; hex matches
      if( !m ) continue;              // No match found

      // Loop through matches and indices *from the end*.
      for( x=1/0, i=m.length ; i-- && 0 <= (x=s.lastIndexOf(t=m[i],x)) ; --x )
      {
         // Create a normalized key (k :: `#RRGGBB`)
         k = t.toUpperCase();
         4===k.length && (k=t.slice(0,2)+t[1]+t[2]+t[2]+t[3]+t[3]); // #RGB -> #RRGGBB

         // Get or create the corresponding Color (cached!)
         if( q.hasOwnProperty(k) )
         {
            color = resolve(q[k]);
         }
         else
         {
            (color=K.itemByName(k)).isValid
            ||
            (
               rgb = parseInt(k.slice(1),16),
               pp.colorValue = [ 0xFF&(rgb>>>16), 0xFF&(rgb>>>8), 0xFF&(rgb>>>0) ],
               pp.name = k,
               q[k]=(color=K.add(pp)).toSpecifier()
            );
         }

         // [CHG240113] Supports empty ADD_ON.
         if( !ADD_ON )
         {
            // Colorize the hex code.
            p = x;
            z = t.length;
         }
         else
         {
            // Insert ADD_ON and colorize it.
            p = x + t.length;
            sto.insertionPoints[p].contents = ADD_ON;
            z = ADD_ON.length;
         }
         sto.characters.itemByRange(p,p+z-1).fillColor = color;
      }
   }
}
findReplaceHexColors( ); // You can pass in an 'add-on' string, e.g "\t\u2022"
• Original discussion: indesign-javascript-to-replace-hex-text-with-actual-hex-colored-letter-chatgpt-letting-me-down-887349
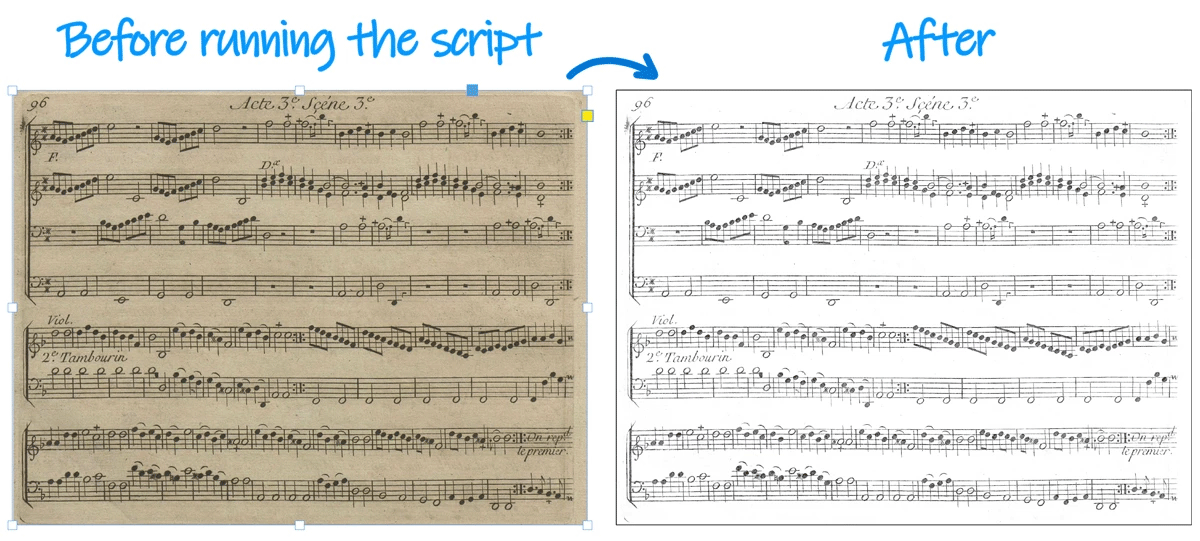
How to Remove a Background Color in InDesign
Pierret wrote: “In Indesign, if I open a multipage PDF, is it possible to remove its background (by using Indesign only)? In that case, I would like to remove a yellow background”
Image processing is of course the way to go, but here you might fake it using SCREEN blending mode on a BLACK background.
Simple demo script:
(function(  orig, dup,g)
//----------------------------------
// Assuming a simple image container is selected on the page.
{
   // 1. Basic enhancer.
   (orig=app.selection[0]).properties =
   {
      strokeColor: "Black",
      transparencySettings: {blendingSettings:{blendMode:+BlendMode.SCREEN}},
   };
   with( dup=orig.duplicate() )
   {
      graphics.everyItem().remove();
      fillColor = "Black";
      sendToBack();
   }

   // 2. Increase the B/W contrast if needed.
   g = orig.parent.groups.add([orig,dup]);
   (dup=g.duplicate()).properties =
   {
      transparencySettings: {blendingSettings:{blendMode:+BlendMode.COLOR_BURN}},
   };
})();
• Original discussion: is-it-possible-to-remove-background-in-indesign-only-889765
5/ Miscellaneous
How to Deal with Libraries and Assets
Is it possible to access library items from scripts?
As such, the Library object (container of assets) corresponds to an indl file — assuming local lib — and can be accessed and/or instanciated through app.libraries. This collection is empty if no library is presently available (=opened) in InDesign, but you can use app.libraries.add("/path/to/MyLibrary.indl") to load a particular library. The name property of a Library instance — still assumed local — is the underlying file name. If your library is already loaded in InDesign, just use myLib = app.libraries.itemByName("MyLibrary.indl") to get the corresponding specifier.
From then, go to the Assets collection (myLib.assets) to navigate through the items this library contains. As usual, those elements are accessible by index or by name. So, if a particular asset is named template, you can easily retrieve a specifier using myAsset = myLib.assets.itemByName("template") and then enjoy the Asset API.
What you’re probably looking after is myAsset.placeAsset(<where>), whose Document or Text instance, and which returns the placed item(s) as an array. The placeAsset behavior/target depends on myAsset.assetType, but in common cases you should expect this method to position the placed asset at its original location, that is, at the coordinates it owned when the InDesign user drag-and-dropped the item into the Library panel. (Changing the default placeAsset mechanism is an open question to me, although I admit I haven’t experimented much in this field.)
• Original discussion: accessing-library-items-from-scripts-894780
How to Use the ‘afterNew’ Event
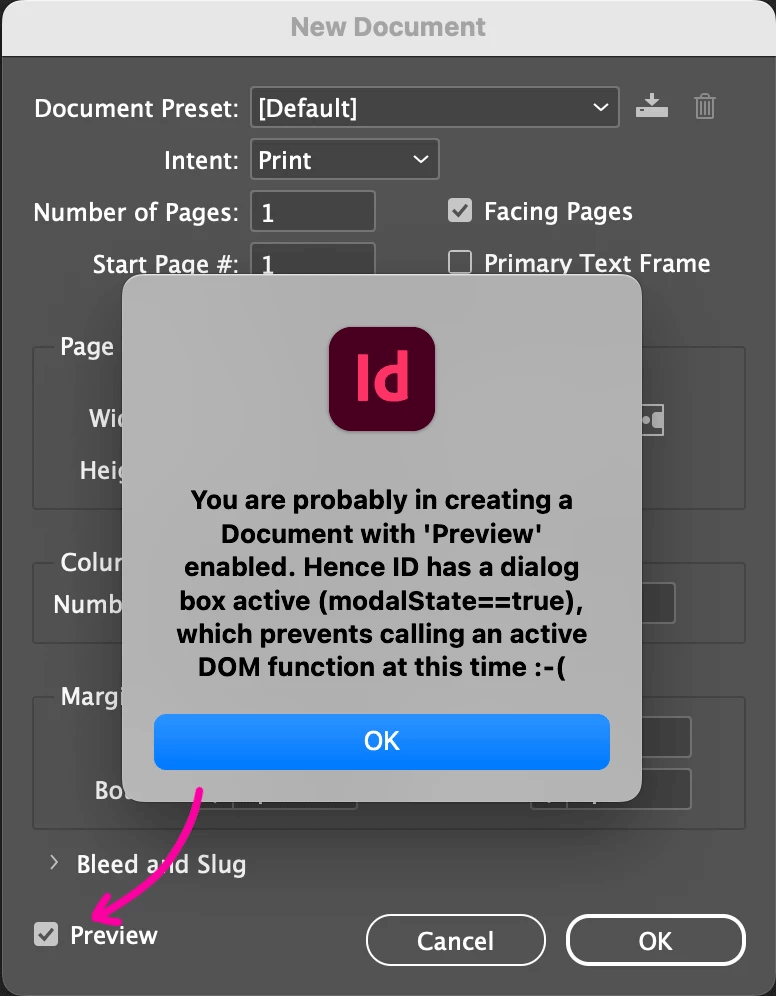
Mark wrote: “I’m trying to run some ExtendScript code when the user creates a new document but I’m not getting it to work. I’ve probably made a basic mistake, which someone can point out, but otherwise, could anyone test my script on their system? I expect it to name the first Layer ‘TEST’ but for me it throws an error (which the script handles and displays in an alert).”
Since afterNew is triggered whenever a document is created, it can occur in various circumstances including when a modal dialog is active, due e.g. to the Preview checkbox of the New document dialog. (Maybe this also occurs under other conditions…)
The script below helps clarify this.
//----------------------------------
// TEST AFTER_NEW
// [REM] This script does not require a persistent engine,
// run it once to install the event handler.
//----------------------------------

(function(/*any*/ev,  doc,msg,ff,t)
{
   if( !(ev||0).isValid )
   {
      // Install the event listener (if not yet installed!)
      // ---
      const UID = 'myAfterNewHandler';
      (ff=File($.fileName)).exists
      && !((t=app.eventListeners).itemByName(UID)).isValid
      && ((t.add('afterNew',ff)).name=UID);
      return;
   }

   // Checkpoint.
   // ---
   if( 'afterNew' != ev.eventType ) return;
   doc = ev.target||0;
   if( 'Document' != doc.constructor.name ) return;

   // Process.
   // ---
   if( app.modalState )
   {
      msg = "You are probably in creating a Document with 'Preview' enabled. "
      + "Hence ID has a dialog box active (modalState==true), which prevents "
      + "calling an active DOM function at this time :-(";
   }
   else
   {
      try
      {
         doc.layers[0].name = 'TEST';
         msg = "Worked fine."
      }
      catch(e)
      {
         msg = "An error occured:\r" + e.message + " [" + e.line + "]";
      }
   }

   alert( msg );

})($.global.evt);
The crucial parameter is app.modalState. As stated in the original error message you encountered, you cannot send an active DOM command while a modal window is open. This is a fundamental rule of the scripting system. Depending on how the New Document dialog is used, the app might be in a “modal state” at the exact moment the document is generated. This particularly occurs when the Preview checkbox is enabled, causing the document to be created in the background (triggering the afterNew event).
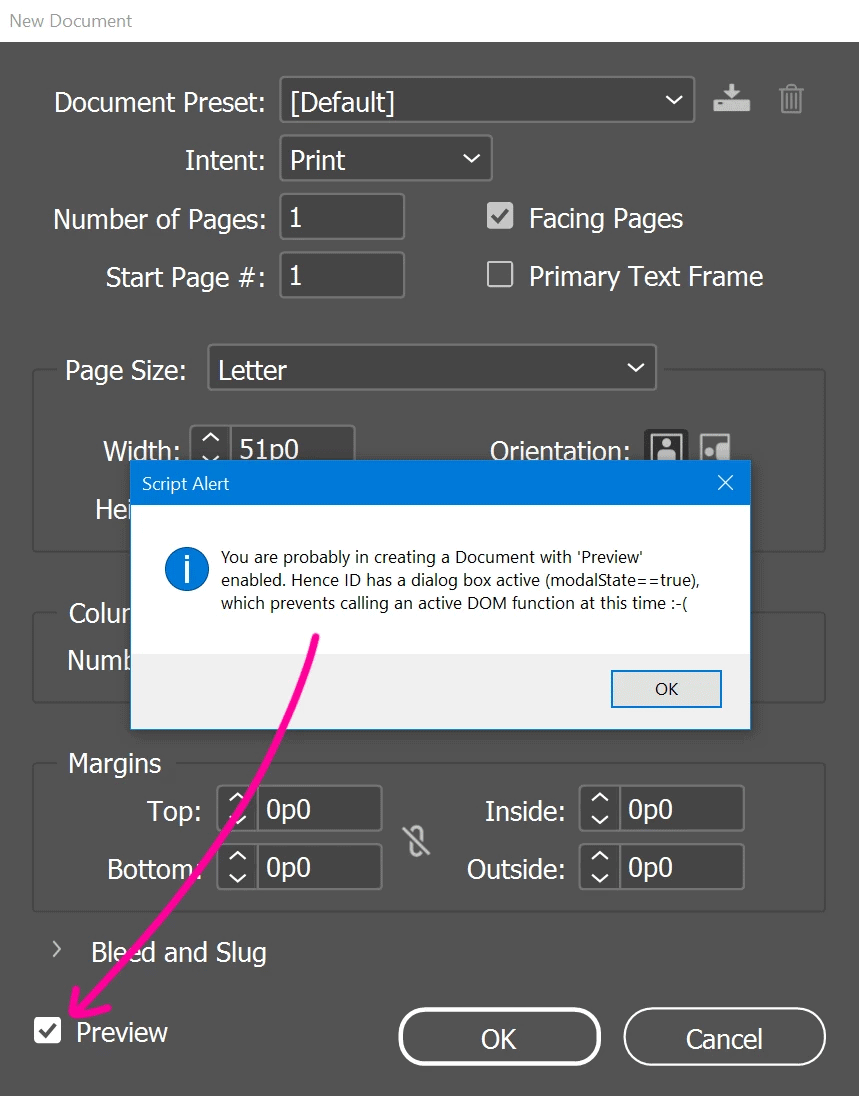
Outside of these cases, the script appears to work as expected on both macOS and Windows. InDesign’s behavior is consistent. I also noticed that the document may be created (and the event fired) even before the New Document dialog opens, in which case it does not yet have an associated LayoutWindow. (However, this does not prevent renaming a layer.)
Nevertheless, this background document remains a frustrating issue when trying to implement an afterNew handler that sends DOM commands. I haven’t investigated the problem further, but I suspect we may need to target a different event.
How to Replace an Existing Hyperlink
When working with hyperlinks in a document, you might encounter a situation where you want to add a new hyperlink to a page item that already has one assigned. Since a page item can only be linked once, the existing hyperlink must be removed before creating the new one.
The question is, how can we efficiently identify and remove the existing hyperlink associated with a specific page item before adding a new hyperlink?
To handle this smoothly and with good performance, it’s best to create a map that links each page item’s ID to its corresponding hyperlink source ID. This map should be created once and cached for quick lookups during hyperlink removal.
The exact way to maintain this map depends on how hyperlinks and page items are created in your workflow. If they are created dynamically (either manually or through scripts) you need to update this map whenever hyperlinks or page items are added or removed.
Here is a function that demonstrates the core logic:
— It takes a document and a page item as inputs.
— It checks if the page item currently has a hyperlink source.
— If so, it removes the hyperlink source object.
— It returns true if the removal was successful, or false otherwise.
The function builds a cached map of page item IDs to hyperlink source IDs by scanning the document’s hyperlink sources only once, improving performance on repeated calls.
var removeHyperSource = function(/*Document*/doc,/*PageItem*/item,  id,K,q,re,t,a,b,i,r)
//----------------------------------
// Conditionally removes the hyperlinkPageItemSource object that points out to item.
// If the link no longer exists or cannot be removed, returns false.
// => true [OK]  |  false [KO]
{
   // Checkpoint.
   // ---
   if( (!doc) || 'Document'!=doc.constructor.name ) throw "Invalid document";
   if( !(item||0).isValid || !(id=item.id) ) throw "Invalid PageItem";

   // HyperlinkPageItemsSources (collection.)
   // ---
   K = doc.hyperlinkPageItemSources;

   // Id-to-id map, made up once (cache.)
   // q :: { PageItemId => HyperlinkPageItemSourceId }
   // ---
   if( !(q=callee.MAP) )
   {
      re = /\d+(?=\]"\))/g;
      t = K.everyItem();
      a = t.sourcePageItem.toSource().match(re)||[]; // `<pageItemId>`[]
      b = t.id;                                      // <hypiSrcId>[]
      if( a.length != b.length ) throw "Invalid 1-to-1 correspondance.";
      q = callee.MAP = {};
      for( i=-1 ; ++i < a.length ; q[a[i]]=b[i] );
   }

   // Identify and remove the hypersource.
   // ---
   r = (t=q[id]) && (t=K.itemByID(t)).isValid;
   if( r )
   {
      try{ t.remove(); }catch(_){ r=false; }
      delete q[id];
   }

   return r;
};

// TEST
//----------------------------------
var doc = app.properties.activeDocument;
var item = app.selection[0];
var r = removeHyperSource(doc,item);
alert( r ? "OK" : "KO" );
• Original discussion: script-any-way-to-check-a-hyperlink-using-specific-pageitem-as-sourcepageitem-875053
Understanding Measurement Units (Practical Summary)
A frequently shared method to get the width and height of an InDesign document in some target unit looks like this:
function docDims(doc,unit)
{
   var w = doc.documentPreferences.pageWidth;
   var h = doc.documentPreferences.pageHeight;

   var wu = doc.viewPreferences.horizontalMeasurementUnits;
   var hu = doc.viewPreferences.verticalMeasurementUnits

   var wRet = UnitValue(w,wu).as(unit);
   var hRet = UnitValue(h,hu).as(unit);
   return {width:wRet, height:hRet};
}
However, this approach is not foolproof. It can cause runtime errors if the current measurement unit is set to certain values, such as MeasurementUnits.AGATES, .INCHES_DECIMAL, .CUSTOM. Additionally, in some regional editions of InDesign (notably CJK versions), other units like .AMERICAN_POINTS, .BAI, .HA, .MILS, .Q, and .U may also cause issues.

This inconsistency arises because the MeasurementUnits enumeration in the Document Object Model does not always align perfectly with the units supported by the UnitValue object in ExtendScript.
The UnitValue constructor in ExtendScript supports two main usage patterns:
• UnitValue(valUnit) where valUnit is a string, e.g., "5 mm"
• UnitValue(value, unit) where value is a number and unit is a string, e.g., (8, "px")
When you write code like:
wPX = UnitValue(10, MeasurementUnits.INCHES).as("px");
what happens behind the scenes is type coercion. The MeasurementUnits.INCHES enum is converted to its string representation "INCHES", which the UnitValue constructor accepts (case-insensitive). This is why the code works in many cases.
Notes: Units can be specified in various forms—abbreviated, singular, or plural—and are parsed case-insensitively. For example, "cm", "CM", "centimeter", and "CENTimeters" are all equivalent. In older versions of InDesign, enumerators like MeasurementUnits.INCHES were encoded as simple numbers and did not coerce to strings, making this pattern unsafe.
The discrepancies between MeasurementUnits and UnitValue are well documented in the $$.Unit module of the IdExtenso framework, which aims to bridge these gaps. For more details, see the relevant code here:
• Original discussion: indesign-javascript-document-dimensions-width-and-height-in-pixels-or-any-unit-886803
About the ‘xmlns’ case in ExtendScript/XML
Immijp wrote: “I am trying to use an InDesign jsx file to read an xfdf file which has been exported from a form in Adobe Acrobat. I want to be able to find nodes by name attribute and return the value as a variable. I am following the XPath Syntax which seems quite simple. I am able to get a response from xpath using wildcards ("//*") but as soon as I try to search for anything specific it returns nothing ("//field.value") or "//field[@name='File_1']/value". I am sure I am close but cannot work out why these queries are coming back empty.”
I strongly suspect that the biggest part of the problem is that your XML has all its elements namespaced due to the xmlns instruction at the root node:
<xfdf xmlns="http://ns.adobe.com/xfdf/" ...>
This means that in expressions like xmlData.xpath("//field/value"), ‘field’ and ‘value’ are not the actual node names (only their local names I guess), but xpath is so poorly implemented in ExtendScript that you risk spending entire nights before finding a syntax (if any) that could get around this difficulty.
Maybe the best option would be to remove the whole xmlns stuff before entering the XML constructor (it’s easy to detect and remove it at the string level), then to re-insert that very namespace if you need to output some XML file at the end of your process.
If you can’t bypass xmlns, the only solution I can see is the explicit and formal use of QName patches through the following scheme:
// Get the ns and create a dedicated QName function.
var ns = '' + myXML.namespace();
var f = function(nme){ return QName(ns,nme) };

// Then use f('nodeName') wherever needed.
// Boring? I know!
Now here are some tests you can run based on the above method:
// Content of your XML file
var xmlFile = '''<?xml version="1.0" encoding="UTF-8"?>
<xfdf xmlns="http://ns.adobe.com/xfdf/" xml:space="preserve">
<f href="Automation Form Test 1.pdf"/>
<fields>
<field name="File_1"><value>ABCDEF</value></field>
<field name="File_2"><value>Some Text</value></field>
<field name="File_3"><value>Some more text</value></field>
</fields>
<ids original="00054952DF51F14FB50D88332A014639" modified="B16CF70A22E4F341A0F65B6E7D370758"/>
</xfdf>'''
;

var xmlData = XML(xmlFile);

// Create your dedicated QName function.
var ns = ''+xmlData.namespace();
var f = function(nme){ return QName(ns,nme) };
var x;

// Get the <value> from all fields
x = xmlData.descendants( f('value') );
alert( x.toXMLString() );         // show nodes
alert( x.text().toXMLString() );  // show inner texts

// Get the <value> node of the 2nd <field> i.e. index 1.
x = xmlData.descendants( f('field') )[1].descendants( f('value') );
alert( x.toXMLString() );         // show node
alert( x.text().toXMLString() );  // show inner text

// Select the <field> whose @name is 'File_3' and gets its <value>.
x = xmlData.descendants( f('field') ).xpath("node()[@name='File_3']").descendants( f('value') );
alert( x.toXMLString() );         // show node
alert( x.text() );                // show inner text
No doubt much better approaches exist…
• Original discussion: reading-information-from-an-xml-file-in-indesign-888373
