Porting your InDesign Script into IdExtenso — Step 4
October 09, 2021 | Tips | en
The previous episode dealt with modularity in IdExtenso, now is the time to take full advantage of it! Today we will see how to add a dialog interacting with user options. You will be amazed at how quickly this component fits into the script…
Preamble
IdExtenso provides various tools and modules for building advanced user interfaces. If your project needs sophisticated ScriptUI controls and event managers, you will probably turn to ScriptUI.builder and our custom factories.
However, simple dialogs perfectly fit the Dom.Dialog module, which offers a nice encapsulation of InDesign's DOM Dialog object and all associated widgets. $$.Dom.Dialog dramatically simplifies the declaration of a dialog: just pass in a XML description of all components (including additional attributes if needed) and you instantly get a consistent Dialog instance ready to run.
The box below recaps the XML elements that $$.Dom.Dialog can digest, both in abbreviated form (4 uppercase letters) and in full form:
// CONTAINERS
DCOL or DialogColumn
DROW or DialogRow
BPNL or BorderPanel
EGRP or EnablingGroup

// RADIOS
RGRP or RadiobuttonGroup
RBTN or RadioButtonControl

// MISC
STAT or StaticText
CBOX or CheckboxControl
DROP or Dropdown

// EDITBOX WIDGETS
TEBX or TextEditbox
AEBX or AngleEditbox
IEBX or IntegerEditbox
MEBX or MeasurementEditbox
PEBX or PercentEditbox
REBX or RealEditbox

// COMBOBOX COUNTERPARTS
ACBX or AngleCombobox
ICBX or IntegerCombobox
MCBX or MeasurementCombobox
PCBX or PercentCombobox
RCBX or RealCombobox
Abbreviated elements make it possible to give a very compact format to your XML data, as in our example:
<Dialog name="MyDialogTitle" canCancel="true">
    <DCOL>
        <MEBX key="radius" caption="Radius" min="0.25" max="20" />
        <MEBX key="stroke" caption="Stroke Weight" min="0" max="4" />
    </DCOL>
</Dialog>
Note the presence of a special attribute, key, that is automatically connected to the corresponding properties when you invoke the custom methods setValueKey and getValueKey associated to any Dialog. (This special behavior is obtained by extending Dialog.prototype when the module starts up.)
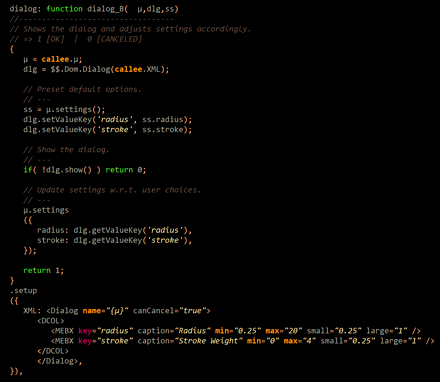
Now, take a look at the unique function we're going to add to our code:
Could we make it easier?
Our Base example (Version 4)
All we have to do is to #include the $$.Dom.Dialog module from the '/etc' branch of IdExtenso. Then we invoke $$.Dom.Dialog(myXMLDescriptor) to get a reference to the Dialog instance.
Here is the entire code of the new PathNodes script:
Really, there are very few changes from the previous version:
• Line 12 contains the #include directive for the extra module. Additional IdExtenso modules could be included at this location (after the entry point.)
• Line 14 updates the YYMMDD number, so IdExtenso knows we're working on a new version of $$.PathNodes.
• Lines 183-210. Here is implemented our new public method dialog. It creates a Dialog, presets the default options via µ.settings(), displays the dialog and updates the settings if the user has clicked OK.
• Line 213. A little trick here: the XML descriptor contains the placeholder "{µ}" which refers to the present module and retrieves its name (actually, the returned value of toString().) This avoids hard-coding the string "PathNodes".
• Line 228. That's the unique change in the run process, we have simply replaced the condition µ.canRun() by µ.canRun() && µ.dialog(), so the UI is shown before entering the hotProcess.
• Line 242-244. Another little trick! In TRACE mode, the regular command $$.PathNodes.run() is maintained so we can undo each step while debugging. Otherwise, it is more convenient to make the entire script undoable.
Here we go:
Note that the settings are not persistent for the time being. This will be the subject of the next chapter.
Enjoy!


